Showing posts with label Retro Sketches. Show all posts

Thursday, 6 October 2016

Feeding My Lawn Fawn Obsession!

Hi everyone

Note, this is a project heavy post!

In this post, I have a couple of challenges that I'm entering, so keep scrolling!

I missed last week's Retro Sketch Challenge and thought I'd give it another go this week. I was SO pleased to see that the card I'd made specifically for the challenge could still be entered because it's 'Pick Any Previous Sketch' to play with week, so I thought I'd enter last week's card.

As that kinda felt like I was cheating a bit I also thought I'd use a different sketch to come up with something new too.

I don't know about you but I do love a good sketch. I find it quite hard to come up with ideas on my own but once I have a sketch it seems to unlock some creativity somehow.

So first up is Week 233's sketch:


And this is what I came up with:


Our really good friends are about to have bubba number two, they know it's going to be a girl so I'm hoping they got that bit right! (Hey, if it turns out to be a boy, you might get a blue version on my blog too!)

So for the deets of how I made it:

I started by die cutting out a pink square and then attached a second square over the top of it in pink gingham paper, that I'd cut off at an angle. The dies are Wonky Stitched Squares by Die-namics.

I coloured three dummies and a stork with my Copics from the Lawn Fawn Plus One baby set. I used R85, R83 and R81 for the pink, and C1 and C0 for the grey. I used YR09, YR04 for his beak and a dot of R20 for his cheek. 

I don't have the dies for the storks or the rattles (yet!) so I just fussy cut them with scissors. Don't look too close, you'll see the bad cutting! I then stamped and die cut the clouds from another Lawn Fawn set, Blue Skies, and added a bit of BG10 to outline them.

Using the newer Big Scripty Words stamps and dies, I stamped the word 'Congrats' and cut it out. Finally, I added everything to the card, adding pop dots for dimension on one of the clouds, the stork and the rattles. 

It was a really fun sketch to use. I'm definitely going to be adding this to my go-to-sketch stash :)


For my next card, I chose Sketch #137


I created a little interactive card for my bestie, who LOVES Halloween. Hope she's not reading this blog post! The photo does make it look a bit bigger than it is. The card size is 3in by 5in (I think).


To learn how to make this card I watched this fab little video, so I'll just share the other detail rather than the way I did that bit. I cut a piece of patterned paper for the card background, and then die cut a circle out of a piece of grey card. The dies I used for the circle are Wonky Stitched Circle Dies by Die-Namics. 

My bestie is buying me the fabulous Lawn Fawn Dotted Rectangle Stackables dies for Christmas so I'm really excited to be adding those to my collection soon. Now you know why she's my bestie! Only kidding, she's amazing too!

Next, I die cut another smaller circle from the grey cutoff to make the little circle in the middle. I followed the instructions from the video for the coin and added my little Copic coloured ghost with the hat to the coin to make her interactive. I then stuck another little ghost on the middle circle and the little word 'boo'. 

Ooh I nearly forgot - the ghosts! They are the stamps and dies from the adorable little Halloween set by Lawn Fawn, called Booyah.

To match the XXX's I used 3 little silver gems, in descending order, and finally, I pop dotted the whole panel to add some dimension. I'm really pleased with how it turned out, I haven't made an interactive card like this before.

I then fed my new obsession with Lawn Fawn's Small Stitched Envelope Dies. I am honestly not joking. I got the die set for my birthday and I can't get enough of them. I've made get well notelets, packs of notelets for people to give away, bookmark pockets for myself, my daughter and the one below, thank you cards and more! We've had unicorns and flowers, and owls, and, and, and! They are SOOOO much fun to make! I am totally addicted!  Here's a close-up of the ghost...


See that adorable little tag that I tied on with twine?! Eeek, how adorable are they?! I used another one of my totally new favourite stamp and die sets - Lawn Fawn Tiny Tag Sayings & Dies. Another must have for your crafty collection. 


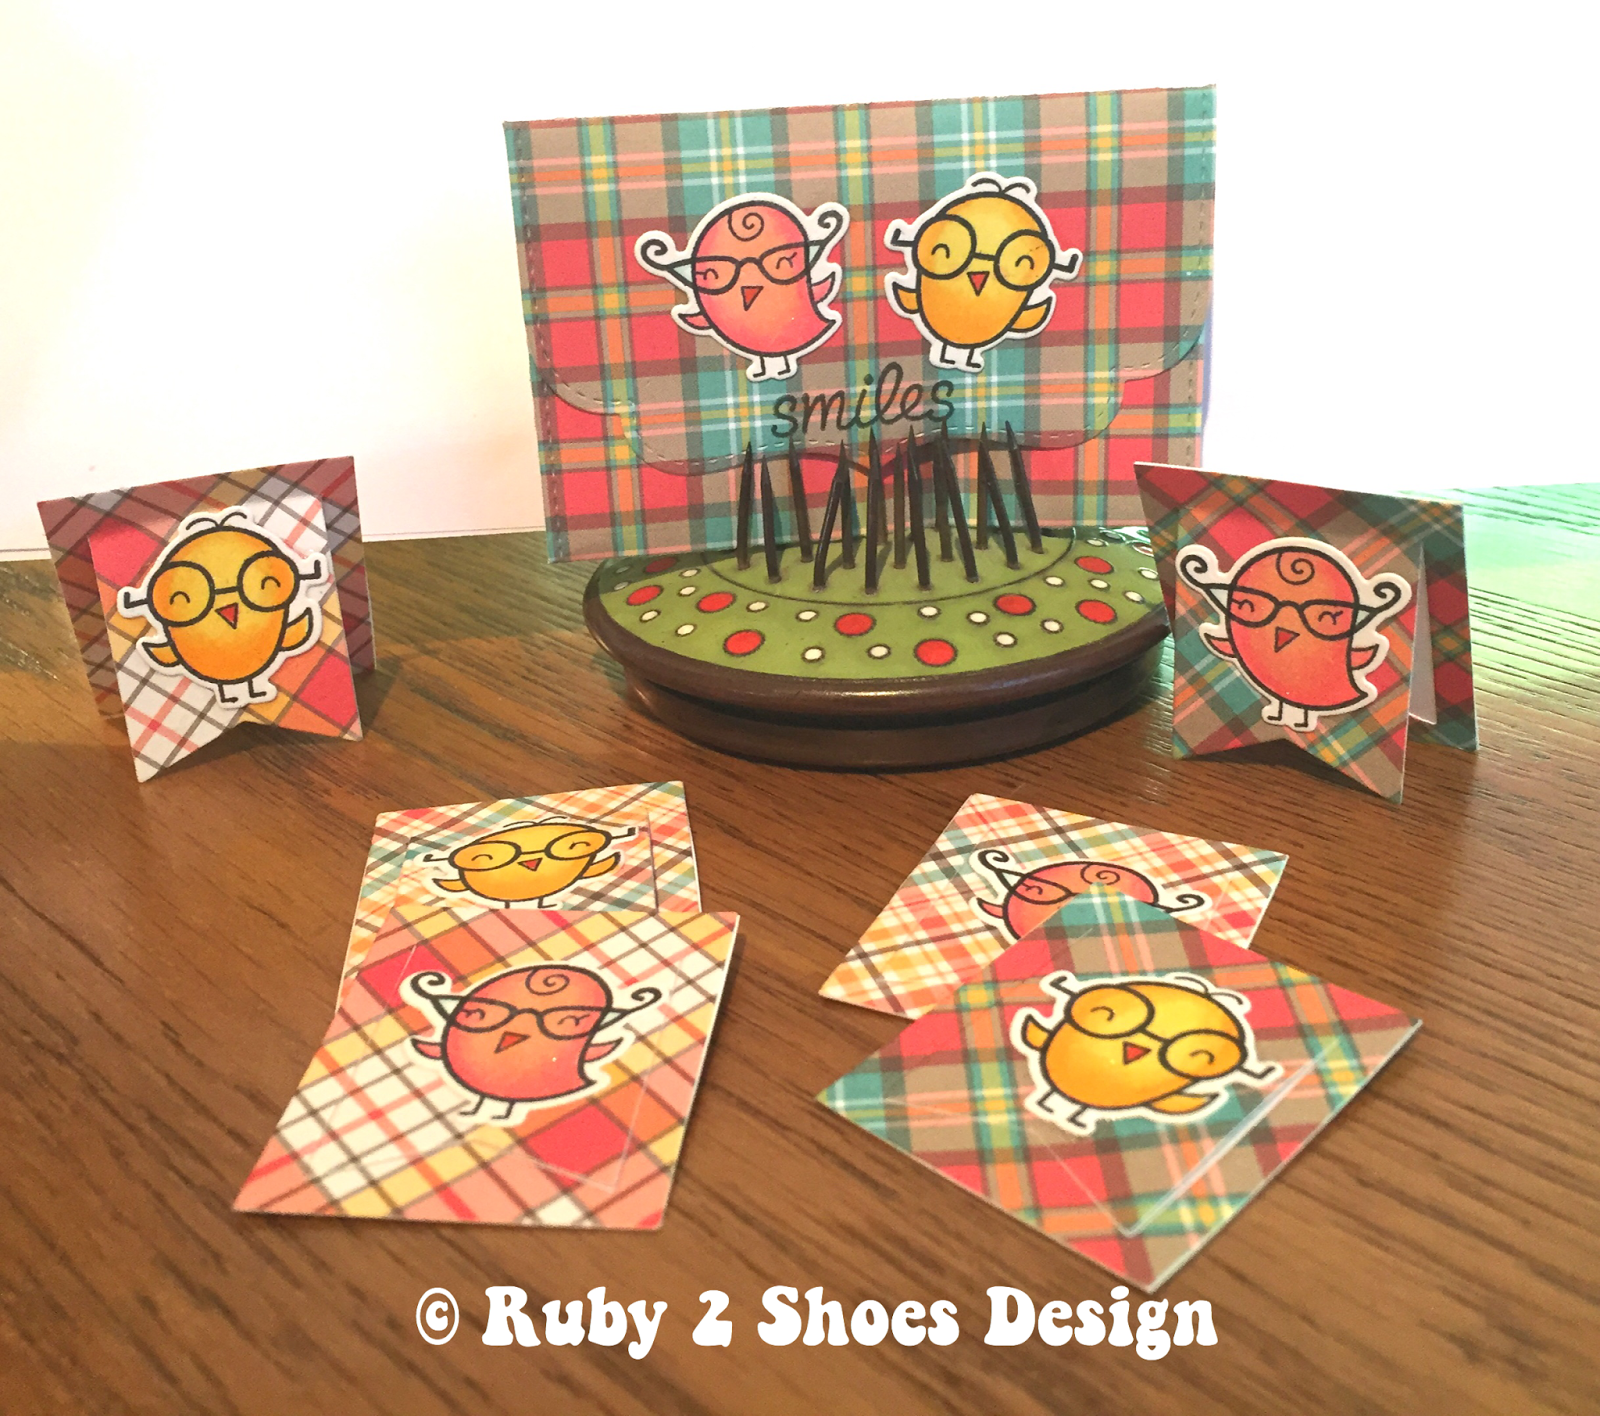
And finally, I've created these for the current Lawnscaping Challenge. The challenge is to be inspired by the colours in this Pinterest board:


Using the Lawn Fawn Science of Love set, their gorgeous Perfectly Plaid Fall 6 x 6 paper set and Paper Smooches Bookmarks Die, I pulled together this little set. Those cute little birds and all that colour make me so happy!! 

I thought my lovely little nerdy birds would look good in a peachy orange and yellow, inspired by the image so I made this little bookmark holder. As part of my coaching biz, I have LOADS of notebooks, so I love making little bookmarks to mark special places I need to revisit. This little pocket envelope is the perfect size to store them in. 


That's it from me today. I hope it's inspired you to get your coloured pens out and have fun! If you promise you won't get too bored, I may share some of the other things I've made with those mini envelopes soon too! I warn you though, you might end up addicted like me!


Tuesday, 12 March 2013

You’re My Universe

Hi there!  Today I’m sharing a little card today over at Make The Day Special that’s out of this world!  This card is for my beautiful daughter, Natasha, because she is my Universe!  I love her to bits!
MTDS 120313
I’m using the latest sketch from Retro Sketches

For details of the stamp set and Copics I used pop on over to the MTDS Blog.

Hope you have a fab week!

Ciao for now!


Tuesday, 5 March 2013

Happy 4 U

*Post amended to update links*

Good morning!  Today I have a post over at Make The Day Special where I’m sharing details about this card…  A bit less cutesie for a change…

MTDS 050313

I'm not sure if you know but MTDS is under new ownership, a lovely girl called Louise Nicolleau, this is the new logo - isn't it adorable!

Make The Day Special

I used this gorgeous sketch for inspiration from Retro Sketches...


I made this card for someone that has made some fabulous health changes and lost lots of weight.  She took a decision to look after herself.  How well do you take care of yourself?  If you fancy a bit of fun try out the little quiz on my Coaching Blog to see, it’s all about looking after you.
Have fun!


Tuesday, 15 January 2013

Funky Flower

Hi there. I’ve got a simple little thank you card to share with you today. 

IMG_2190[1]_thumb[2]

I think I could have done with running this through PSE to straighten it up a bit, it is straight in real life, honestly!

For details of the stamp I used pop on over to MTDS where I give the details.

I used this sketch from over at Retro Sketches.  Such a fun little sketch, a really great go-to sketch.

Hope you’re having a really good week.  We have had a sprinkling of snow here today, what’s it like with you?


Tuesday, 1 January 2013

Happy New Year!!

Well hello!!!

Happy, totally wonderful and fabulous New Year to you!  I wish you everything you wish for yourself.

I am here to do the first 2013 post for MTDS, I’m the first person up to start of the New Year.  I made this little notepad for my friend that is mad about sending me ‘Did you know…?’ texts.

MTDS 010113
If you want to know what I used then pop on over to the main MTDS blog for all of the deets.

In writing my post for this I learnt that celebrating the New Year is a tradition that dates back nearly 4000 years. If you had lived in Mesopotamia and Babylon 4,000 years ago (c. 2000 B.C.), you probably would have celebrated the new year in mid-March, at the time of the Vernal (Spring) Equinox. If, however, you were an Egyptian, your new year began with the Autumnal Equinox and the flooding of the Nile. If you were Greek, the Winter Solstice began your new year celebrations.  I’ll shut up now lol.

I’m entering this little project into the following challenges..

Retro Sketches using this sketch..


and Paper Smooches Sparks Anything Goes challenge.

Display our button


Here’s to a fabulous 2013!!

Tuesday, 5 June 2012

MTDS and a Notelet

Hi everyone

If you’re in the UK then I hope you’re enjoying the Jubilee weekend.  We were planning for a BBQ tonight but it’s not looking hopeful.

We’ve been enjoying the last few days of our honeymoon, it’s been so lovely having extra time off together.  We’ve thoroughly enjoyed pottering around and having days out but we’re back to reality this week, ready for early morning starts and less lazy days!!
IMG_1296[1]
It’s my day over at Make The Day Special.  I made a little invite.  I find CAS cards really difficult to make so although this might look like it took 5 minutes it actually took ages because I want to keep layering and layering!

I used this fab sketch from Retro Sketches.  Isn't it a great go-to sketch?


For details of the stamp set and Copics I used pop on over to the Make The Day Special Blog.

Have fun, hope the weather holds out for whatever you’re doing today.

Sunday, 8 April 2012

Easter Wishes

Happy Easter everyone!  I hope you’re having a lovely relaxing day.  We have been really lazy, we had a gorgeous roast beef dinner with all of the trimmings and have now settled down for a little bit of tv.

I made today’s card for the latest Retro Sketches challenge.  I’ve been hoping to play along with them each week but it hasn’t quite worked out that way. It’s such a fab ‘go-to’ sketch, I love it!
IMG_0833[1]
Here’s their fab sketch..
image
I nearly didn’t post this card because I don’t like that bottom leaf.  If I was doing this card again I would move it to the bottom left, diagonally opposite the other one, but anyway as someone I know would say, ‘it is what it is’ so I will just let it go even though it drives me nuts each time I look at it lol

Enjoy the rest of your day.  I hope you get to eat lots of chocolate and have some time to play too.

Have fun!

Thursday, 15 March 2012

A few more cards

Hey!  Thanks for popping by my little corner of the world.  Today I’m back with a few more cards.

First up is one that I made for the St Patricks Day challenge over at Create: (but I managed to miss the deadline. Need to check when that is!) and also for the Guest Design team search over at Paper Smooches.   I used the sketch over at Retro Sketches again but kept to it better this time.  I’m also linking this one up to our Paper Issues challenge.  This little man is from Paper Smooches, really a gnome but hey he works as a leprechaun too, don’t ya think?!  The wording is a really old stamp from Hero Arts, and when I say really old I mean years!!  The dies are PTI Mat Stack.IMG_0762[1]
image
On the subject of going green I have a little giveaway for you.  You may remember some time ago I did a little review of a recycling book and played around with some embossing of diet coke tins.  It’s just amazing what you can recycle when you know how!  Anyway, there are now more books available and I have kindly been given 10 to giveaway on my blog.  If you’re interested pop on over to www.alteredupcycling.com and sign up for the free guide.  Then you just need to enter your email address in the field given and add ‘ruby’ (without the apostrophes!) to the end. In a week’s time Mahe will randomly select 10 winners and send you the book.  Simple, huh!

Next up are two cards that I made using the lovely clock stamps from Uniko Studio.
SA 150312 (2)
A really quick and simple card…  I used some patterned papers and the lovely flowers from the set.  I matted the card base with patterned paper, and stamped the sentiment in brown. This range of papers has some journalling tags so I just took one of the circular ones and die cut it with some Nestie circles before adhering it to the card base. I stamped them in brown and then cut around them, placing one directly onto the circle and the others pop dotted.  The leaves are just hand cut and scored down the centre, again attached with pop dots.  Pearls were added to the centres to finish.

Next up is another simple card using some Kaisercraft patterned papers. 
SA 150312
For this card I used one piece of patterned cardstock for the base, that I cut into two.  The top half I attached directly to the card base as shown.  For the bottom half I stamped some cogs in Versamark and heat embossed with white embossing powder.  Using Ranger Distress Ink (Faded Jeans) I distressed over the embossed cogs.  If you look closely you may be able to make out the tiny green leaves showing through the cogs. 

Using a Fiskars punch I die cut a border to match.  I stamped the time docket onto some polka dot paper to add a bit of interest and then added a little journalling panel (both from the same pad).  Finally I stamped the sentiment in brown onto some white cardstock and hand cut it into a banner. Some polka dot ribbon tied around the panel before finally sticking everything down, and then the panel was pop dotted.  A MS butterfly die cut in gold and again in white finished off the centre panel with some pearls added to complete the card.  All supplies of these two cards can be found over at The Stamp Attic’s fabulous online shop.

That’s it from me now on the clocks front, I hope you’ve enjoyed the designs I’ve been playing around with.  It’s been fun stepping out of my comfort zone. 

Gotta dash, so if you need any more details on the supplies I've used just give me a shout and I will be more than happy to help.

Have fun!

Wednesday, 14 March 2012

Gorgeous Colour Combo

Hello again!  I hope you’ve had a good week so far.

I’m here today with a card  for Retro Sketches.  I was asked to make someone a card in purple and turquoise for Mother’s Day and this is what I came up with.  Isn’t this colour combination gorgeous?  I’m so glad I was reminded of how wonderful these colours are together.  I hate to show my age but a very, very long time ago my Mum made a mohair knitted cardigan for herself in these colours and it brings me back YEARS!!.  I wonder if you remember that cardigan Mum!!

Lots of PTI and Memory Box goodness on this one!  The font is just typed on my computer.
IMG_0747[1]
Here’s the inspiration ..
image
As you can see mine is a twist on the sketch.  I am definitely going to start saving these sketches to file, they are just so simple they conjure up dozens of ideas.  Great challenge blog girls!!

The purple paper was inspired by the rug in the Tuesday Trigger challenge picture over at Moxie Fab World.  I always love that damask pattern!  The wall hanging also acted as inspiration for my memory box fancy die cut in turquoise.


Here’s another card I made recently using one of my favourite Greeting Farm stamps.  If you haven’t played along with our challenge over at Color Me Creative then pop on by, there's still time to join in and it’s a great excuse to get some colouring done!!
IMG_0752[1]
I want to practice my black hair colouring a bit more, it’s fun to do, I need to work on where to put the shading next. We have a fun birthday bash coming up too so come and join in on the fun!


I’ve got a post for Play Date Cafe to get sorted, so I’ll be back tomorrow!

Have a great day.

 
Blog Design By -Lindsey Joy Design- ©All Rights Reserved