Thursday, 30 September 2010

PDCC 49

Hey there!

It's SO good to be back playing along in the Play Date Cafe. I really missed not being able to join in last week. My little princess is now heaps better so I'm back, yay!


This week we are being sponsored by Technique Junkies.  Technique Junkies publish a newsletter every other month featuring 15 or more stamping techniques in a step-by-step format.

The technique we were asked to use is called Clipped Corners.  You stamp your image and then trim back the corners on one side.   I don't very often try new techniques so this was fun, but I'm not sure the outcome really worked.  I made the card, then looked at it and thought it looks more like I've stuck the heart on instead of actually cutting it away.  I have cut it away but it looked so flat I had to add a 3d layer.  Is that cheating??  Probably, but it meant I could sleep lol

These are Sarah's challenge colours.  Isn't that lamp pretty?!


I showed my friend the card and she just asked, 'where's the orange?'  Well if you look closely you will hopefully see that I coloured in the centre of the blue flowers (given to me by Sav - thanks sweetie!) with an orange copic marker AND the centre of my pink ribbon has an orange dotted line.  So see, my dear friend that doubted I had used all of the challenge colours, I SO did!!!!


Pat Huntoon, owner of Technique Junkies,  is also our guest designer this week, so don't forget to pop by her blog too.
  1. Mat base with brown cardstock
  2. Stamp heart using Versamark, emboss
  3. Starting at top edge of heart cut away the left hand side of the card (in hindsight I should probably have trimmed less of the bottom of the heart (the actual card was as wide as the left edge of the heart) to make it work for the technique but if you read my 'ps' below you will see that this just wasn't an option!
  4. Cut oval nestie, stamp with sentiment and attach to heart, add a flower embellishment
  5. Punch border strip in white, add pink/orange ribbon and embellish to finish
  6. Moan to your other half that you're not sure it works for the challenge, but that you did do the clipped corner as shown, vow to do better next time!
ps - this card may look like it was thrown together, but trust me that heart stamp nearly got thrown in the bin many times, not because it's a poor stamp but because I realised (too late!) that I have a quirky uneven table which stops things being stamped properly.  Now I know I've told you this about another card many moons ago, but I thought that was the only table in the house with the quirky issue, but it turns out there are more of them lol

Don't forget to pop by the rest of the design team to see what they've created.


Pop on over to the Cafe and link your post. If you use an online gallery, please use the keyword PDCC49, and don't forget to use our inspirational colours to be eligible to win!

Back soon with some more to share.


Monday, 27 September 2010

Hi everyone

I hope you had a lovely weekend and got nice and artsy when you could!

I have a simple little card to share with you today that I haven't blogged yet. I needed a quick card for a friend and decided to raid my daughter Tink's stash instead of mine for a change. She was very good about it all, adding that she normally takes all of mine so she doesn't mind sharing.  Aww, bless her! 

This card is 3 x 3, my fave size at the minute as I'm sure you know.  I forget sometimes how much fun it is to use chipboard, I must use it more often!

Enjoy the rest of your day/evening.  I'll be back with some more to show you soon.

Take care


Friday, 24 September 2010

Happy Birthday Julie!!

Hi there everyone

If my scheduling has worked you should be seeing a card with a yummy cake on it!  

I made this card for Julie over at the Julie's Open Window.  It's a very special birthday for her today, so Happy Birthday Julie!!! 

I hope you have a wonderful day, get lots of time to craft and get a cake as big as this one!!


I have known Julie since joining the Play Date Cafe Challenge design team, which she heads up.  She is such an encouraging and caring person, who has always made me feel welcome from day one, and genuinely cares about the people that play along with our challenges.  She goes the extra mile to make us all feel part of a great team.  As if she wasn't busy enough with the PDCC she also has her own personal blog. She makes some fab creations so pop on over to see her.  You won't be disappointed. 

I used this 2 Sketches 4 You sketch.  Such a simple sketch, but it really sparks my creativity.  Thanks Laura, love it!

I seem to be on a bit of a Cosmo Cricket (DeLovely) thing at the moment.  Every time I make a card I want to use these papers!  I hope you don't get too fed up with seeing them!  I used Lawn Fawn stamps for the cake and sentiment, did a little bit of stitching (I thought you were worth the effort Julie!) and distressed the edges of my paper. When I do this I always wonder if people will think I've just grabbed an old scrap of paper that should have been thrown out!  It's ok for us in the card making world, but what about those that don't know the latest trends.  What will they think of it all lol

Hope you likey!


Thursday, 23 September 2010

Waltzingmouse Sketch Challenge

Hi everyone

I managed to get a few minutes to post about a card I made earlier this week for the Waltzingmouse Sketch.


My Mum asked me to make some more dreaded 'man cards'. For those that follow my blog you will know these really aren't my favourite. I don't know about you, but it can be so easy for man cards to look so, well let's be honest, uncool! My friend and I were having a discussion with Mum to explain that man cards don't need all the fuss on them that we do for women's cards. They just like plain, simple, to know they've been remembered and that's about as far as their interest goes (according to my man anyway lol)

I used my new Papertrey Ink dies with some Basic Grey papers.  Those stamps are SO much fun to play with.  The little tickets are adorable, and that 'Say it With Style' font for the 'Happy Birthday' is such fun!  I hadn't seen much of it, but now I have the set I keep seeing it everywhere, on coffee tins, on books, signs etc!  Funny how that happens!


So tell me what are your special ingredients for making a good 'man card' as they are called in our house? Do you have fall back ideas that you return to again and again? I'd love to hear all about them! I need all the help I can get!

So how did I do? Is it ok?? Please forgive the poor picture, I was hoping to get around to rephotographing it but Mum put it in the post before I got chance.

Did Mum like it? Hmmm, not sure, but she does feel a bit happier about it being more simple, so that's a good start!

Come back tomorrow, I have a scheduled post for a special someone! ;o)

PDCC 48

Hi everybody

Sorry I've been a bit quiet, my daughter has been really poorly with asthma, so I haven't had chance to do anything.

It's Thursday so please do pop over and join in with the Play Date Cafe fun though. I had hoped to join in but my Florence Nightingale duties took over. The girls have all done a fabulous job and we have a great sponsor too!

I will be back tomorrow with a card, providing my scheduled post works! 

Have fun!

Friday, 17 September 2010

Waltzingmouse Sketch Challenge #14

Hi there

Finally I got a chance to sit down and join in with Waltzingmouse Sketch Challenge, I love their sketches but never quite get chance to play, and guess what... I just popped over there to check the deadline date and I've missed it again lol.  Typical! 

Here is the sketch, as you can see I flipped it!  

I got lots of Papertrey Ink stamps as pressies, so had to play with my ticket stamps and die cutter.  Ooh what fun they are, I was like a little kid trying out lots of new designs!  Papers used are DeLovely by Cosmo Cricket, the punched border is by Martha Stewart and the BEAUTIFUL polka dot ribbon was a birthday gift from my crafting friend, luverly! The little houses stamp is by Stampotique.  Aren't they quirky?!

Have a great day!

Thursday, 16 September 2010

PDCC 47 with Paperbag Studios

Happy Thursday everyone!

I'm really pleased you've popped by for our latest colour challenge from the Play Date Cafe! This week Sarah Anderson has chosen some lovely bright colours for us, mixed with some black and white. We are being sponsored by Paperbag Studios, and have Roben Marie-Smith joining us too as Guest Designer!

I LOVE the stamps we were given to work with for the challenge, they are really funky!  I decided to make a little book with mine, see below...


This set is called Doodles & Daters..


There are just so many possibilities for it.  I love it when you see a set and it sparks off lots of different ideas of how to use it, fun!!   The challenge this week weren't the colours, but what stamps to use first because they're all so yummy!


This is Sarah's colour story, isn't that picture great?!!!  I'd like to have that as my studio!!


  1. Cover card base with black card stock, stamp images in Versamark and emboss with clear powder
  2. Stamp a strip onto blue cardstock
  3. Stamp label, and the word 'Notes:' onto white cardstock and mount onto a larger piece of red polka dot paper.  Pop dot the label over the blue strip
  4. Cut out and round corners of two pieces of scrap paper, stamp stitching and add a doodled flower from the set, add stickles to centre of flower
  5. Stamp and fussy cut file tabs for edges of pages
  6. Stitch in some pages to make a book, and add file tabs to finish
  7. Send to a friend to get a double check on if it's ok or not because it's so random.  Smile when she says, 'I love it, I want it!'  At least you know now it's not going to be stashed away in a drawer never to be seen again ;o)
Stamps:  Doodles & Daters by Paperbag Studios, Papertrey Ink 'It's Official' (notes stamp)
Papers: Various scraps from stash

I couldn't stop at one project with this set so I also made a quick new home card here...


Don't forget to pop by the rest of the design team to see what they've created.


So come and join in on the fun!  You could win a $25 gift certificate in the Paperbag Studio store. 


Pop on over to the Cafe and link your post. If you use an online gallery, please use the keyword PDCC47, and don't forget to use our inspirational colours to be eligible to win! I'm still going around and doing comments, so if I haven't got around to yet I will!

Back tomorrow with another card for a challenge.  Have a great day!


Wednesday, 15 September 2010

Time to Celebrate - I made a card lol

Hey there everyone

Firstly thank you so much for all of my wonderful birthday wishes.  I will get around at some point to see you but until then please know how very much I appreciated them.  I was really touched at how many I got.  I believe a little bird told you all about it on her blog too!  So thank you, you made my day! :o)

Well,  I finally made a card! Sorry for my lack of blogging, it's been a bit of a funny week. We were busy at the weekend and then my little princess went away with her school on Monday for the week, and Mummy isn't liking it very much so her mojo kind of died a bit!  Just 2 sleeps to go now, not that I'm counting or anything!!

Anyway, I've made a little card to share with you today, it's a 3" x 3" card, I LOVE this size card, it's so cute!  I used Papertrey Ink Fillable Frames die and stamp set with a Martha Stewart butterfly punch.  I'm not sure who the paper is by, I can't seem to find the information on it (must have thrown that away at some point lol).  All finished off with a pretty piece of copic coloured ribbon, and a couple of pearls.

Hope you like it.  I will be back tomorrow with a project for the Play Date Cafe, it's a bit random for me so it will be interesting to see what you all think of it!

Have a great day!  Ciao for now ♥


Thursday, 9 September 2010

PDCC 46 - You Can Have Your Cake And Eat It!

Well hello again!

It's time for the newest Play Date Cafe Challenge.  This week it's a colour splash and we are being sponsored by Creative Cuts and More, who specialise in die cut templates, bags, labels, shapes etc.  We got to play with some card templates so I chose to work on this lovely cake slice box.


I have to be honest I had no idea at all what to make with this, and I managed to get started at around midnight on Tuesday!  For my flower I used this tutorial.  It was great fun to create!  I love challenges, they really push you.

Here are the details of how I made it..
  1. Stamp template with black flowers
  2. Assemble box
  3. Add gems to centre of flowers
  4. Create flower using the tutorial shown above
  5. Die cut a white nestie label and a larger label in pink, adhere
  6. Stamp the word 'enjoy!' on the tag and attach to the box underneath the flower to finish
Stamps: Papertrey Ink 'Beautiful Blooms II', Lawn Fawn 'Harold ABC's'
Dies: Tim Holtz 'Tattered Florals'
Papers: Black, pink and white Bazzill cardstock
Accessories: Glitter brad from stash, swarowski crystals

Don't forget to check out the rest of the DT's inspirational pieces.


So come and join in on the fun!  You could win this fab prize!

Pop on over to the Cafe and link your post. If you use an online gallery, please use the keyword PDCC46, and don't forget to use our inspirational colours to be eligible to win!  I'm sorry if I didn't get chance to pop by and comment last week, hopefully this week will be a bit easier. 


Wednesday, 8 September 2010

A Bit of Copic Colouring

Good evening!

As promised here is a card that I made with my Copics, my first proper attempt since going on my Copic course.  The card was quick to make, I wish I could say that about the colouring!!

I am entering it into the 'Color Me Copic' challenge where you have to try out a hair technique by Amy Young.

Hope you like it :o)

Tuesday, 7 September 2010

Tiffany Doodles 4


Hi everyone

It's time for another fun challenge over at Tiffany Doodles!  This month we are using a colour palette.  As you all know pale colours are a bit of a challenge in themselves for me, but I thought I'd challenge myself a bit further and try to manipulate one of the images in Photoshop.  I chose Tiffany's latest Label 5 image, it's gorgeous!!! 

Here's what I made with it;


Here is the colour palette.. 


The card itself was very simple, it was the playing on Photoshop that took me the time, but I did it!!  I am a novice at it, but I'd definately play again, it was fun!

Here are the details;
  1. Mat card base with green polka dot cardstock (Bazzill) 
  2. Download labels 5 die image, (see link above) change colours in Photoshop programme
  3. Fussy cut around the edges of the label and mat onto black cardstock
  4. Stamp on 'bundle of joy', tie on double ribbon with twine
  5. Using nesties cut border in pink and black, attach to card as shown
  6. Colour white ribbon with a cream Copic pen to match the card, tie with a knot to the side
  7. Stamp teddy in pink and attach a smaller double button with twine to finish
Don't forget to check out the rest of the DT's blogs, they've done some great cards!
You have until the end of the month to enter for a chance to win some fab prizes! More details can be found on the main Tiffany Doodles site, just pop on over there to enter. Don't forget to grab our blinkies for your blog too!


Sunday, 5 September 2010

Embellish Challenge & Recycling Pepsi Max Tins!!!

Hi there everyone

I hope you're all having a wonderful weekend! We went blackberry picking yesterday so that I could make some more of my apple & blackberry jam. I can't tell you how many 'ouches' there were as we picked them. We got spiked, stabbed and scratched all over the place, but came home with a nice supply of fruit! :o)

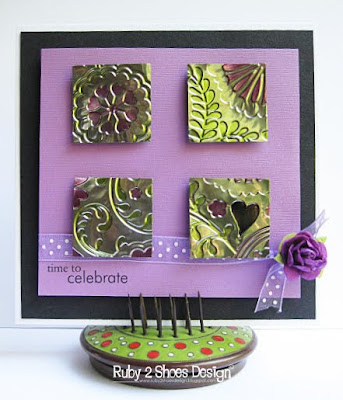
Today I'd like to share a card with you that I made for the current Embellish challenge. The challenge is to use purple, green and black, with squares.

Here is what I made...


I thought this would be the perfect opportunity to use some skills I've recently learnt using metal/plastic, in this case Pepsi Max tins! I was sent an e-book written by Mahe Zehra Husain,  called 'Crafty Cans and Perplexing Plastic' that she wanted me to review, but of course I couldn't just read it, I had to play! When I saw the Embellish challenge I knew what I wanted to make.  Can you believe those little metal squares have 'Pepsi Max' written all over the back of them.  How cool is that?!!!!! 

I don't know about you, but I know I have to think about recycling.  Don't get me wrong I do recycle the usual items, like household jars/tins, clothing etc etc. but it's very easy to throw away odd scraps of paper and other bits that could be saved and used another time, but it's something else to hoard that will never be found again!  I really do want to recycle more though, so when Mehe sent me the book I was very interested.  Her e-book teaches you how to make great use of those old aluminium cans and plastic items that you throw away, and turn them into embellishments for cards, jewellery, items for around the home, tags etc.  It is a step by step instruction manual, very clearly written, with lots of colourful ideas of how to create mini pieces of art with things that we would normally just throw away.  I have only used one of the techniques she has shown, there are many more to try.

The book explains how to use your Cuttlebug or Sizzix machine to make your own embellishments.  In the book Mehe uses Sharpies to colour in her images, but as I didn't have any of these to colour with (and didn't want to spend £12.99 on a pack just to try out something that I might not even enjoy!)  I decided to see if my Copics would work.  Well they do!  After embossing my image onto my little squares I then coloured them in with Copics, it is such good fun!  But even better is the fact that if you make a mistake and go over the edges of the pattern you can use the colourless blender to remove them!!!  You can use other mediums, such as Tim Holtz alcohol inks, but I will leave that for the clever crafters out there lol.  I just feel proud that I managed to use an old tin to create something pretty!  Fun!!

This is what has been said about the book ...

This full color 40 page e-book covers all the techniques you will need to create your own cards, embellishments, jewelry and home decor items.  The book features step by step instructions with accompanying photographs, in all the book has 58 full color photographs to guide you through the magical process of upcycling and to inspire you to create your own art!

You can see more information on the book here and the link to buy it is here.  So pop on over to the links and see what you think, let's try and use up more of our rubbish while having some fun in the process!

Happy playing!!

Thursday, 2 September 2010

PDCC 45

Happy Thursday everyone!  Hope your week is going well so far, it's nearly the weekend again.  Yay, more time to play with my card making supplies!!

It's time for another challenge at Play Date Cafe, and it's an exciting week for us too...

We have Andrea Ewen joining us as our new Private Blend Designer.  Andrea does some amazing work with punches, her cards are beautiful.

We also have Sankari Wegman as our celebrity guest designer.  Sankari uses lots of colour and I just LOVE what she does with liquid pearls, she makes some fab cards :o)  As you know I do like my colour!  So please give a big welcome to both of them, and pop on over to their blogs to see what they've created.

The colours this week are a plum, tan and beige.  Here's what I came up with...


I have to make a little confession.  I really don't like this card at all.  It's not very me.  I like the colours, so it's not that, it's just a bit plain for me I think, but I couldn't decide what to change.  Natasha whipped it out of my hands and said I shouldn't be so critical about it, I should just blog it!  Goodness me, my 10 (nearly 11 year old) is turning into a right old bossy boots lol.  She goes back to school tomorrow.  Aw, I'm really gonna miss her, I hate it when she's back at school, it's so much fun having her around.  We have such a giggle, she's very funny.

For the ribbon I tried a technique that Debbie Olsen uses quite often.  I've been meaning to try it out for a while, so was pleased when I actually had a go.  Another thing off my to do list :o)  Thanks for the inspiration Debbie!

This is the PDCC inspiration picture, which I actually found very inspiring, it just didn't look that good when I put it all together lol.  If I'd have had a bit more time I think I'd have had another go at it.

So to make the card...
  1. Mat a plum cardstock base with patterned paper
  2. Die cut labels in tan and white cardstock
  3. Stamp two flowers on white die cut label, stamp sentiment
  4. Punch hole at either side of the label and slot ribbon through, attaching at the back
  5. Tie bow to side
  6. Add twine to buttons and fix to card with pop dots
  7. Hold card out in front of you and frown, wishing you had more time to play and do another one
Stamps: Papertrey Ink 'Signature Greetings', Ippity 'Now and Always'
Papers: Black Market Paper Society 'Let it Bloom', Bazzill Cardstock
Accessories: SU! polka dot ribbon, buttons from stash

Don't forget to check out the rest of the DT's inspirational pieces, and hop over to the main blog too as we are sponsoring this week's prize.

Suzanne Czosek

So come and join in on the fun!  Pop on over to the Cafe and link your post. If you use an online gallery, please use the keyword PDCC45, and don't forget to use our inspirational colours to be eligible to win!

Wednesday, 1 September 2010

Happy Flowers!

Hi everyone

I thought I'd share a simple little card with you that I made some time ago. Hope you like it.  I just used DeLovely papers by Cosmo Cricket, some black cardstock, Judy's Blooms & Petite Florals from Lawn Fawn.


I'll be back tomorrow with a card for our latest PDCC challenge.  We don't have a horribilis challenge this week though, hope you're not too disappointed :o)  It was fun seeing what people created with the colours, there were some great entries.

Ciao for now ♥

 
Blog Design By -Lindsey Joy Design- ©All Rights Reserved